How to Troubleshoot a Refrigerator Water Dispenser
Hey there, fellow homeowners! If you’ve ever stood in front of your fridge, pressing that water dispenser button only to get a sad dribble or nothing at all, you’re not alone. Refrigerator water dispensers are a modern convenience we often take for granted—until they stop working. Whether it’s a leaky spout, frozen lines, or just […]
Hey there, fellow homeowners! If you’ve ever stood in front of your fridge, pressing that water dispenser button only to get a sad dribble or nothing at all, you’re not alone. Refrigerator water dispensers are a modern convenience we often take for granted—until they stop working. Whether it’s a leaky spout, frozen lines, or just low pressure, these issues can be frustrating. But don’t worry; troubleshooting isn’t as daunting as it seems. In this guide, we’ll walk you through the process step by step, helping you diagnose and potentially fix the problem yourself. And if things get too tricky, remember that professional help is just a call away. For folks in North and West Vancouver, Canada, and the surrounding areas, northvancouverappliances.ca offers high-quality appliance repair services that can get your fridge back in tip-top shape quickly.
I’ve been dealing with home appliances for years, and I’ve seen it all—from simple fixes like changing a filter to more complex issues requiring a pro’s touch. Let’s dive in and get your water flowing again.
Understanding How Your Refrigerator Water Dispenser Works
Before we jump into troubleshooting, it’s helpful to know the basics of how these systems operate. Most modern refrigerators with water dispensers connect to your home’s water supply line, usually through a saddle valve or a dedicated shut-off valve under the sink. Water travels through a filter inside the fridge, then to the dispenser or ice maker.
The key components include:
- Water inlet valve: This solenoid-controlled valve opens when you press the dispenser lever, allowing water to flow.
- Water filter: Removes impurities; a clogged one is a common culprit for poor flow.
- Dispenser switch or actuator: The button or paddle you press to dispense water.
- Tubing and lines: Plastic tubes that carry water; these can freeze, kink, or leak.
- Reservoir or coil: Some models have a water reservoir that chills the water before dispensing.
Knowing these parts will make troubleshooting easier. If you’re new to this, grab your fridge’s manual—it’s your best friend here. Models from brands like Samsung, LG, or Whirlpool might have slight variations, but the principles are similar.
Issues often stem from installation errors, wear and tear, or lack of maintenance. For instance, if your fridge is over five years old, components might be wearing out. But let’s not assume the worst yet; many problems have simple solutions.
Common Problems with Refrigerator Water Dispensers
From my experience chatting with customers, here are the most frequent complaints:
- No water comes out at all: This could be due to a frozen line, closed valve, or electrical issue.
- Water flows slowly or with low pressure: Often a sign of a clogged filter or kinked tube.
- Leaking dispenser: Drips from the spout might indicate a faulty valve or worn O-ring.
- Water tastes bad or has particles: Usually filter-related, but could point to supply line problems.
- Dispenser makes noise but no water: This suggests an issue with the inlet valve or switch.
- Ice maker works, but dispenser doesn’t (or vice versa): Separate lines might be affected differently.
Identifying your specific symptom is key. Take notes on when the problem started—was it after a power outage, moving the fridge, or changing the filter? This context helps narrow things down.
If you’re in the North Vancouver area and dealing with persistent issues, northvancouverappliances.ca provides expert diagnostics for all major brands. Their technicians are familiar with local water quality quirks that can affect appliances.
Related: Warning Signs of a Failing Refrigerator Compressor
Safety First: Preparations Before Troubleshooting
Before you start poking around, safety comes first. Unplug your refrigerator to avoid electrical shocks, especially if you’ll be working near wiring. Turn off the water supply valve to prevent floods. Wear gloves if handling potentially sharp parts, and have a towel handy for spills.
Gather tools: A multimeter for testing electrical components, pliers, screwdrivers, and a flashlight. If your fridge has a water filter, have a replacement ready—they’re inexpensive and often the fix.
Also, check your warranty. Tampering might void it, so if your appliance is new, contact the manufacturer first. For older models, DIY is fine, but know your limits.
Step-by-Step Troubleshooting Guide
Alright, let’s get hands-on. We’ll start with the easiest checks and move to more involved ones. Follow these in order for efficiency.
Step 1: Check the Basics
Sometimes, the simplest things trip us up. First, ensure the fridge is plugged in and the circuit breaker hasn’t tripped. If it’s a side-by-side model, make sure the door switch is engaging properly—some dispensers won’t work if the door thinks it’s open.
Next, verify the water supply. Locate the shut-off valve (often behind the fridge or under the sink) and ensure it’s fully open. If it’s a saddle valve, these can corrode; consider replacing it with a better one.
Test the household water pressure by running a faucet. Ideal pressure for dispensers is 20-120 PSI. Low pressure? It might be a home-wide issue—call a plumber.
If everything checks out here, move on.
Step 2: Inspect and Replace the Water Filter
A clogged filter is behind about 50% of dispenser problems, in my estimation. Filters should be changed every 6 months, or sooner if you have hard water.
To replace:
- Locate the filter (usually in the grille at the bottom or inside the fridge).
- Turn off the water supply.
- Twist or push the old filter out, catch any drips.
- Install the new one, following arrows for direction.
- Flush 2-3 gallons of water through the dispenser to clear air and debris.
After replacement, test the dispenser. If flow improves, great! If not, the filter might not be the issue, or it could be installed incorrectly.
Pro tip: Use OEM filters for best results; generics can cause leaks. If you’re unsure about compatibility, northvancouverappliances.ca can source the right parts for you in the Vancouver region.
Step 3: Check for Frozen Water Lines
In colder climates or if your fridge is set too low, lines can freeze. Feel the tubing behind the fridge for ice buildup. If frozen:
- Unplug the fridge and let it thaw naturally (a few hours).
- Or, carefully use a hairdryer on low heat, avoiding direct contact with plastic.
- Insulate lines with foam if this recurs.
For models with a reservoir in the fresh food section, ensure the fridge temp is above 35°F (2°C). Adjust settings if needed.
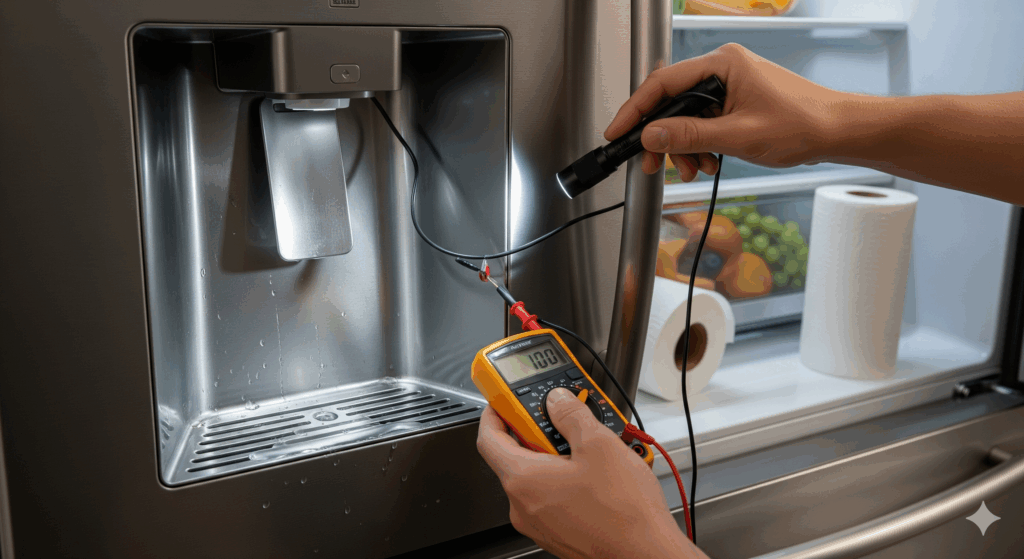
Step 4: Test the Dispenser Switch and Actuator
The switch tells the valve to open. Press the paddle gently—listen for a click. No click? The switch might be faulty.
To test:
- Remove the dispenser cover (screws or clips).
- Use a multimeter to check continuity on the switch terminals while pressing it.
- If no continuity, replace the switch (parts are cheap online).
Be cautious with wiring; label connections before disconnecting.
Related: DIY Guide to Replacing a Refrigerator Water Filter
Step 5: Examine the Water Inlet Valve
This is often the heart of the system. Located at the back bottom of the fridge, it’s electrical.
- Unplug the fridge, turn off water.
- Disconnect tubes (have a bucket ready).
- Test with multimeter: Should show 200-500 ohms resistance.
- If faulty, replace it—match the model number.
Water quality in areas like West Vancouver can cause valve scaling; regular maintenance helps.
Step 6: Look for Kinks, Leaks, or Blockages in Tubing
Pull the fridge out (carefully, with help) and inspect the plastic tubing. Kinks restrict flow; straighten them. Leaks? Tighten fittings or replace sections.
For internal lines, you might need to remove panels—consult your manual.
If mineral buildup is suspected, flush lines with a vinegar solution (1:1 water-vinegar), but only if you’re comfortable.
Step 7: Address Electrical or Control Board Issues
If basics check out, it could be the main control board or wiring. These are trickier for DIYers.
- Check for loose wires or burnt smells.
- Reset the fridge by unplugging for 5 minutes.
- If error codes show (on digital displays), look them up.
At this point, if you’re stumped, it’s time for pros. Northvancouverappliances.ca specializes in refrigerator repairs, offering same-day service in North Vancouver and nearby spots.
When to Call a Professional
Not every issue is a quick fix. If you’ve tried the above and still no luck, or if you hear grinding noises, see sparks, or deal with Freon leaks (rare for dispensers), stop and call help. Pros have diagnostic tools and can handle refrigerant if needed.
Signs you need expert intervention:
- Persistent low pressure after filter change.
- Electrical faults you can’t test safely.
- Leaks inside the fridge walls.
- Brand-specific quirks (e.g., Samsung’s known valve issues).
In the Greater Vancouver area, trusting a local service like northvancouverappliances.ca ensures quick, reliable fixes with warranties on parts and labor. They’ve helped countless families avoid costly replacements by repairing instead.
Preventive Maintenance Tips for Longevity
Prevention beats cure. To keep your dispenser humming:
- Change filters biannually.
- Clean the dispenser spout weekly with mild soap.
- Check water lines yearly for wear.
- Maintain proper fridge temps: 37°F (3°C) for fresh food, 0°F (-18°C) for freezer.
- Flush the system after long vacations.
- Use a water softener if hard water is an issue.
Regular check-ups can extend your appliance’s life. Consider scheduling annual maintenance with a service like northvancouverappliances.ca—they know the local climate’s impact on appliances.
Real-Life Stories and Lessons Learned
I remember a client in West Vancouver whose dispenser stopped after a kitchen reno. Turned out, the contractors kinked the line—simple fix once spotted. Another time, bad-tasting water was from an expired filter; a quick swap fixed it.
These stories show most issues are solvable without panic. But if you’re not handy, pros save time and hassle.
Conclusion: Get Back to Chilled Convenience
Troubleshooting your refrigerator water dispenser can save you money and frustration. By following these steps, you’ll likely pinpoint the problem and fix it yourself. Remember, patience is key—rush jobs lead to mistakes.
If you’re in North or West Vancouver or the surrounding Canadian areas, and need professional assistance, head to northvancouverappliances.ca. They offer high-quality appliance repair services tailored to your needs, ensuring your fridge dispenses crisp, cold water reliably.
Stay hydrated, and happy fixing!